Xamarin Forms Shell: Streamline Your Mobile App Development
November 5, 2023
Xamarin Forms Shell has emerged as a powerful tool for developing cross-platform mobile applications.
In this article, we will explore the features and benefits of Xamarin Forms Shell and how it can streamline your mobile app development process.
What is Xamarin Forms Shell?
Xamarin Forms Shell is a user interface toolkit provided by Xamarin.Forms that simplifies the development of cross-platform mobile applications. It offers a streamlined and efficient way to create the navigation structure and user interface of your app. With Xamarin Forms Shell, developers can save time and effort by leveraging pre-built navigation patterns and UI components.
At its core, Xamarin Forms Shell provides a container for your app’s content, allowing you to easily define and manage the different screens and pages. It introduces a navigation-centric approach, where you define routes and hierarchies to represent your app’s structure. This approach simplifies the navigation flow and reduces the need for manual management of navigation stacks.
Benefits of Using Xamarin Forms Shell
- Enhanced productivity: Xamarin Forms Shell boosts developer productivity by providing a high-level abstraction for common mobile app navigation patterns. It eliminates the need for writing boilerplate navigation code, allowing developers to focus on building the core functionality of their app.
- Consistent user experience: With Xamarin Forms Shell, you can create apps that adhere to a consistent navigation and UI design. It offers built-in support for common navigation patterns like tabs, flyouts, and bottom navigation, ensuring a familiar user experience across different platforms.
- Simplified navigation management: Xamarin Forms Shell simplifies the management of navigation within your app. You can define routes and easily navigate between screens using intuitive syntax. This approach reduces the complexity of handling navigation stacks and ensures a smooth user flow.
- Customizability: Xamarin Forms Shell provides a high degree of customization for your app’s user interface. You can easily apply custom styles, themes, and branding to achieve a unique and visually appealing look. Additionally, Shell allows you to define your own UI components and templates, giving you full control over the app’s appearance.
- Performance optimizations: Xamarin Forms Shell incorporates performance optimizations to deliver fast and responsive app experiences. It leverages efficient rendering techniques, caching mechanisms, and asynchronous loading to minimize load times and enhance overall performance.
- Platform-specific capabilities: While Xamarin.Forms already allows access to platform-specific APIs, Xamarin Forms Shell extends this capability by providing seamless integration with native features and functionalities. You can leverage device-specific capabilities like GPS, camera, and sensors, delivering a native-like experience to your users.
Understanding Xamarin Forms Shell
Xamarin.Forms is a powerful framework for building cross-platform mobile applications. It allows developers to write code once and deploy it on multiple platforms, including iOS, Android, and Windows. With Xamarin.Forms, developers can create user interfaces using a single, shared codebase, saving time and effort.
The framework provides a comprehensive set of controls and layout options that enable developers to create visually appealing and responsive user interfaces. It supports a wide range of UI elements, including buttons, labels, entry fields, lists, and more. These elements can be customized and styled to match the desired look and feel of the application.
One of the key advantages of Xamarin.Forms is its ability to access platform-specific APIs and features. This means that developers can leverage the full capabilities of each platform while still using a shared codebase. Whether it’s accessing native device functionalities like GPS, camera, or push notifications, Xamarin.Forms provides a seamless integration with the underlying platform APIs.
Introducing Xamarin Forms Shell
Xamarin.Forms Shell is a user interface toolkit built on top of the Xamarin.Forms framework. It provides a streamlined and intuitive way to create and organize the navigation structure of a mobile application. With Xamarin.Forms Shell, developers can quickly and efficiently build mobile apps with consistent navigation patterns and a polished user experience.
Shell introduces a simplified approach to navigation by introducing the concept of “routes” instead of manually managing individual pages. Routes represent the different screens or views of the application and can be easily defined and navigated to using a concise syntax.
In addition to navigation, Xamarin.Forms Shell also offers built-in support for common UI patterns such as tabs, flyouts, and bottom navigation bars. These patterns allow developers to create modern and intuitive user interfaces with minimal effort. Shell handles the complexities of managing the navigation stack and presenting the appropriate UI elements based on user interactions.
Key Features and Functionalities
Xamarin.Forms Shell comes with a range of powerful features and functionalities that enhance the development experience and improve the overall performance of mobile applications. Some of the key features include:
- Visual customization: Shell provides extensive options for customizing the look and feel of the application. Developers can easily apply custom styles, themes, and fonts to create a unique and branded user interface.
- Routing and navigation: Shell simplifies the navigation process by introducing a routing-based approach. Developers can define routes and easily navigate between screens, simplifying the management of the application’s navigation stack.
- Tabbed navigation: Shell includes built-in support for tabbed navigation, allowing developers to create apps with multiple tabs and easily switch between them. This is particularly useful for organizing content or providing different views of the application’s data.
- Flyout navigation: Shell enables the creation of apps with a flyout menu, also known as a hamburger menu. This provides a convenient way to access different sections or features of the application without cluttering the main user interface.
- Bottom navigation: With Shell, developers can implement a bottom navigation bar for quick and easy access to key app features. This pattern is commonly used in mobile applications to improve navigation efficiency and user engagement.
- Performance optimizations: Xamarin.Forms Shell incorporates various performance optimizations to ensure smooth and responsive app experiences. It leverages efficient rendering techniques and intelligent caching mechanisms to minimize resource consumption and enhance overall performance.
Getting Started with Xamarin Forms Shell
Installation and Setup Process
To begin using Xamarin Forms Shell, you need to ensure that you have the necessary development environment set up. This includes installing Xamarin.Forms and the required dependencies. Follow these steps to get started:
- Install Xamarin: Before working with Xamarin Forms Shell, ensure that you have Xamarin installed on your development machine. Xamarin provides a comprehensive development platform for creating cross-platform applications.
- Set Up Development Environment: Once Xamarin is installed, configure your development environment. This involves setting up the necessary SDKs, tools, and IDEs. Xamarin supports popular IDEs like Visual Studio and Visual Studio Code, so choose the one that suits your preferences.
- Create a New Xamarin Forms Project: After setting up the development environment, it’s time to create a new Xamarin Forms project. Open your chosen IDE and select the option to create a new Xamarin Forms project. Provide a suitable name and choose the target platforms for your app, such as Android and iOS.
Creating A New Xamarin Forms Shell Project
Once your development environment is ready, you can create a new Xamarin Forms Shell project. This involves creating a new solution and configuring the project settings accordingly. Follow these steps to get started:
- Open Your IDE: Launch your preferred IDE, such as Visual Studio, and open the Xamarin Forms solution you created earlier.
- Add Xamarin Forms Shell Package: Xamarin Forms Shell is available as a NuGet package. To add it to your project, right-click on the solution or project file, select “Manage NuGet Packages,” and search for “Xamarin.Forms.Shell.” Install the package into your project.
- Configure App.xaml: In the shared code project, locate the App.xaml file. Open it and make the necessary modifications to register Xamarin Forms Shell as the application’s main shell. This step ensures that your app uses Xamarin Forms Shell features.
- Create Shell Content Pages: With Xamarin Forms Shell, you organize your app’s content into shell content pages. These pages represent the main sections of your app. Define and design the shell content pages based on your app’s navigation structure and content hierarchy.
Exploring The Project Structure
Upon creating a Xamarin Forms Shell project, you will encounter a specific project structure. Understanding this structure is essential for efficient development and organization of your app’s code. Familiarize yourself with the key components and directories to effectively manage and extend your app:
- App.xaml.cs: This file contains the application’s entry point and acts as the central hub for managing the lifecycle of your Xamarin Forms Shell app. It initializes the main shell and sets up global resources.
- MainPage.xaml: The MainPage.xaml file defines the layout and structure of your app’s main shell. It typically includes a flyout or bottom tab bar for navigation and content placeholders for the shell content pages.
- ViewModel: Xamarin Forms Shell encourages the use of the MVVM (Model-View-ViewModel) pattern for building scalable and maintainable apps. In the ViewModel folder, you’ll find the view models associated with each page or shell content.
- Assets: The Assets directory contains static resources, such as images, icons, and fonts, used in your Xamarin Forms Shell app. Organize your assets accordingly to ensure a clean and manageable project structure.
- Styles: Xamarin Forms Shell provides extensive customization options through styles. The Styles folder holds the style definitions for various UI elements in your app. Customize and modify these styles to achieve the desired visual appearance.
As you explore the project structure, you’ll encounter additional files and folders specific to your app’s needs. Understanding the project structure will enable you to efficiently navigate, manage, and extend your Xamarin Forms Shell app.
Navigation and Routing in Xamarin Forms Shell
Overview of Navigation Concepts in Xamarin.Forms
Navigation is a fundamental aspect of mobile app development. In Xamarin.Forms, navigation plays a crucial role in creating intuitive and seamless user experiences. It allows users to navigate between different screens, access relevant content, and interact with the app’s functionality.
Understanding the navigation concepts in Xamarin.Forms is essential for building effective mobile applications.
- Page-based Navigation: Xamarin.Forms offers a page-based navigation model where each screen or view is represented by a Page object. Pages can be navigated using various navigation methods, such as pushing and popping pages from a navigation stack.
- Navigation Stack: Xamarin.Forms maintains a navigation stack to keep track of the visited pages. When a new page is pushed onto the stack, it becomes the active page, and the previous page is pushed down in the stack. Navigating back removes the top page from the stack, making the previous page the active one.
Navigating Between Different Pages Using Shell
Xamarin Forms Shell simplifies the navigation process by providing a streamlined approach to navigate between different pages within your app.
With Shell, you can easily define and manage navigation routes, enabling smooth transitions and logical flow between screens.
- Shell Navigation Syntax: Shell introduces a concise navigation syntax that allows you to navigate to a specific page or define a hierarchical navigation path. The syntax is intuitive and easy to understand, enhancing the development experience.
- URI-based Navigation: Xamarin.Forms Shell also supports URI-based navigation, allowing you to navigate to specific pages using uniform resource identifiers (URIs). This approach is particularly useful when integrating with deep linking or handling navigation from external sources.
Configuring Navigation Routes and Hierarchies
With Xamarin Forms Shell, you can configure navigation routes and hierarchies to define the flow of your app. This allows you to create complex navigation structures while maintaining a clear and intuitive user experience. By defining routes and hierarchies, you establish the logical structure of your app’s navigation and ensure a consistent user experience.
- Route Definition: With Shell, you can define routes using a combination of route patterns and route parameters. Route patterns specify the URL-like structure of the route, while route parameters allow passing data or parameters between pages.
- Hierarchical Navigation: Shell enables you to create hierarchical navigation structures, where pages are organized in a tree-like hierarchy. This approach is especially useful when building apps with complex navigation flows, such as master-detail or tabbed interfaces.
Handling Navigation Events and Parameters
Xamarin Forms Shell provides various event handlers and mechanisms to handle navigation-related events. Additionally, you can pass parameters between pages during navigation, enabling seamless data exchange.
As users navigate through your Xamarin Forms Shell app, you may need to handle navigation events and pass parameters between pages. Xamarin.Forms provides mechanisms to facilitate these requirements and ensure smooth communication between different parts of your app.
- Navigation Events: Xamarin.Forms offers events like OnAppearing and OnDisappearing that are triggered when a page becomes visible or hidden. You can use these events to perform specific actions, such as loading data or updating the UI, when a page is navigated to or from.
- Passing Parameters: In some scenarios, you may need to pass data or parameters from one page to another during navigation. Xamarin.Forms provides mechanisms to pass parameters through the navigation stack, allowing you to transfer relevant information and maintain context between pages.
Fundamental Features of Xamarin Forms Shell
Common Navigation User Experience
Flyout and Tabs are 2 top-level navigation components brought by Shell to help you accomplish navigation tickets in your project as shown in the following images below.
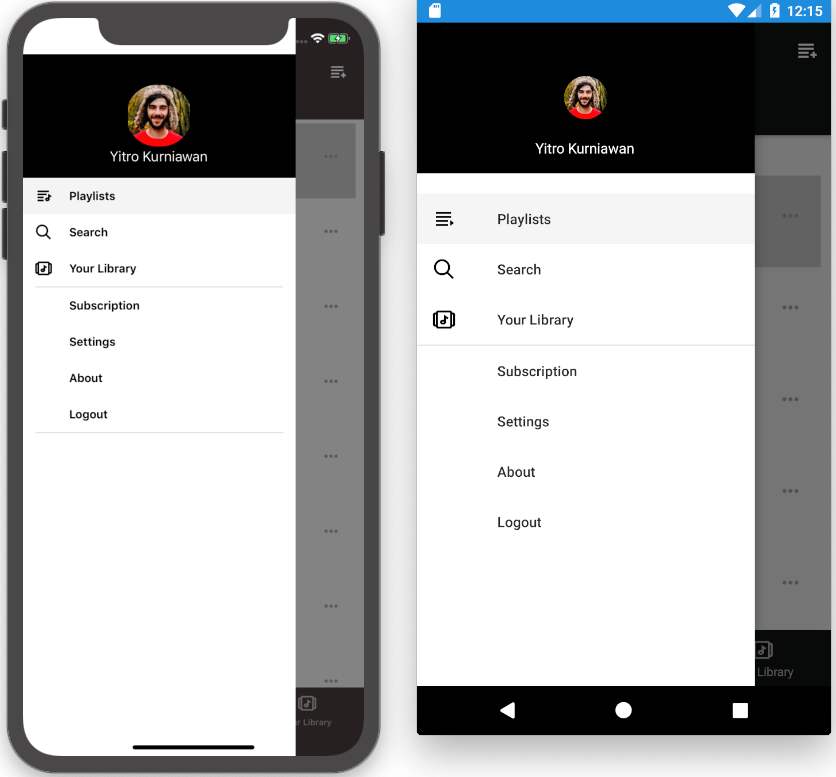

An application can have both Flyout and Tab bar or only one of them at a time. Besides its appearance and behaviour is greatly customizable through the properties and methods that the various Shell classes expose, it’s also possible to create a Shell custom renderer when more refined platform-specific customizations are required like other custom renderers. Followings are overridable methods provided by Shell Renderer class that can be customized and exported from each platform project.
iOS Android SetElementSize
CreateFlyoutRenderer
CreateNavBarAppearanceTracker
CreatePageRendererTracker
CreateShellFlyoutContentRenderer
CreateShellItemRenderer
CreateShellItemTransition
CreateShellSearchResultsRenderer
CreateShellSectionRenderer
CreateTabBarAppearanceTracker
Dispose
OnCurrentItemChanged
OnElementPropertyChanged
OnElementSet
UpdateBackgroundColor CreateFragmentForPage
CreateShellFlyoutContentRenderer
CreateShellFlyoutRenderer
CreateShellItemRenderer
CreateShellSectionRenderer
CreateTrackerForToolbar
CreateToolbarAppearanceTracker
CreateTabLayoutAppearanceTracker
CreateBottomNavViewAppearanceTracker
OnElementPropertyChanged
OnElementSet
SwitchFragment
Dispose
URI-Based Navigation Scheme
Routes
Optimized navigation using Routes enables the user experience to navigate to a specific page without having to follow a set navigation hierarchy. Routes can be defined on FlyoutItem, Tab, and ShellContent objects in code behind or tag in XAML, through their Route properties. Given the sample visual hierarchy of app navigation:
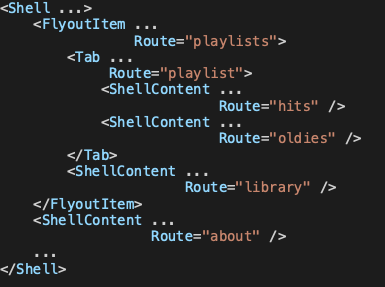
To navigate to the ShellContent object for the ‘dogs’ route, the absolute route URI is//animals/domestic/dogs. Similarly, to navigate to the ShellContent object for the ‘about‘ route, the absolute route URI is //about.
Additional routes can be explicitly registered for any sort of pages that does not exist in the Shell visual hierarchy.

Navigation can be performed by either by passing a valid route string/URI absolute route path or relative route (after registering the unique route name to the routing table) into GoToAsync() method of Current property of Shell object.

Or

Deep Linking
When a Shell app receives Deep Link or App Link, the URL can be easily processed by removing the schema and app domain. And then it leaves the rest path including the query parameters as an argument to navigate to the target page. This is also can be used as in-app navigation.

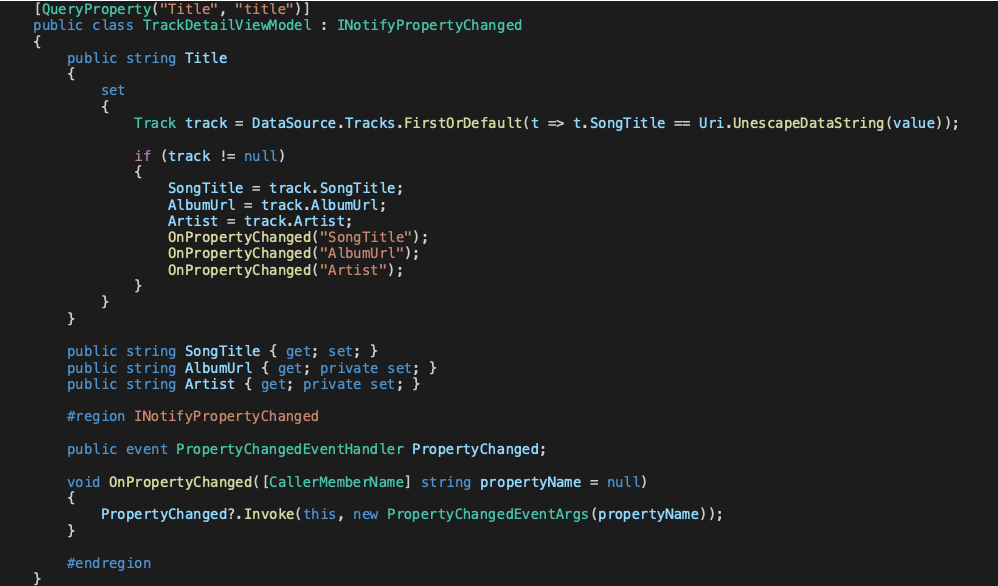
And the target View Model can capture the parameter by decorating the View Model property with Query Property Attribute which specifies the name of the property that will receive the data, with the second argument specifying the query parameter id. Note that when you pass the query parameter, the value is being URL encoded so it needs to be decoded before use. Multiple Query Property Attribute objects are also supported in a class.
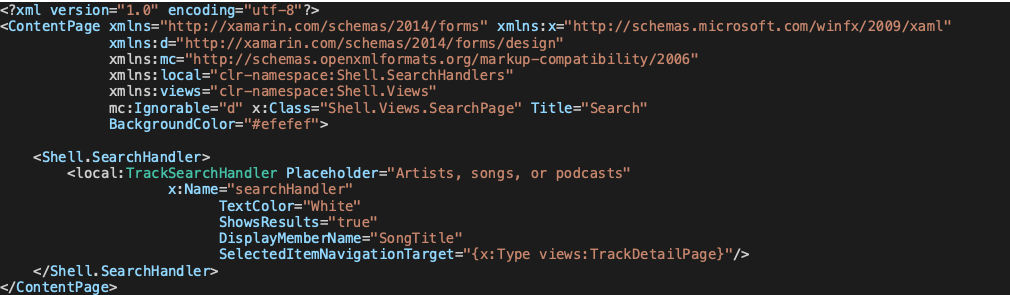
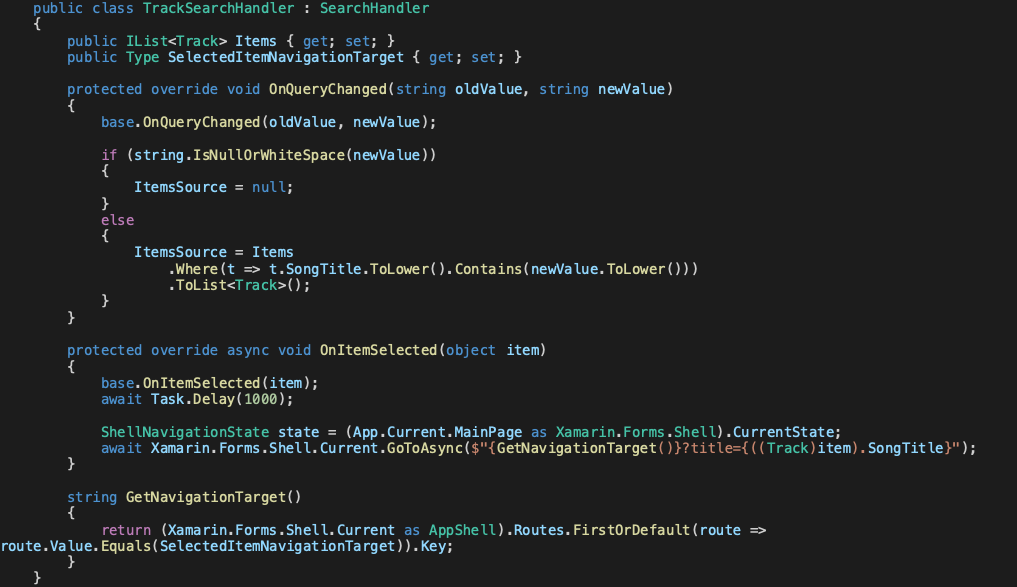
Integrated Search Control with Shell Page
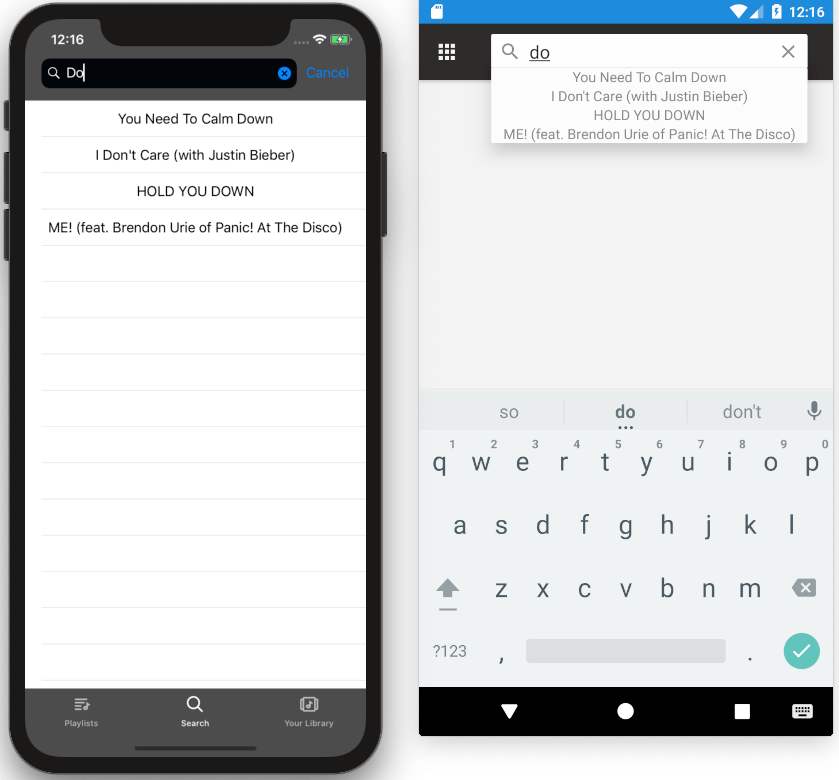
The integrated search functionality in the pages is also provided by Shell application to save development time. With a search box that can be added to the top of each page, the search query is handled by custom Search Handler that processes the underlying data source and returns the results back to the search box and displays them in a popup list.
UI Customization and Theming
Styling Xamarin Forms Shell Components
Xamarin Forms Shell provides a rich set of styling options to customize the appearance of your app’s UI components. You can apply styles to controls, layouts, and other visual elements to achieve a cohesive and visually appealing design.
In Xamarin Forms Shell, you have the power to customize the appearance of various components and elements to create a visually appealing and cohesive user interface. By applying styles to Xamarin Forms Shell components, you can ensure consistency throughout your app and reinforce your brand identity.
- Styling Options: Xamarin.Forms provides a wide range of styling options to modify the appearance of Shell components. You can define styles for Shell tabs, flyout items, navigation bars, and more. These styles can include properties like fonts, colors, backgrounds, and borders.
- Cascading Styles: Xamarin Forms Shell supports cascading styles, allowing you to define base styles that can be inherited by child elements. This simplifies the styling process, as you can set common properties at a higher level and have them automatically applied to child components.
Using Custom Fonts and Icons
To add a personal touch to your app’s UI, Xamarin Forms Shell allows you to utilize custom fonts and icons. This enables you to align the visual identity of your app with your brand or design requirements. By incorporating custom typography and visually appealing icons, you can enhance the overall aesthetic and improve the user experience.
- Custom Fonts: Xamarin.Forms allows you to include custom font files in your app and use them throughout the UI. This enables you to choose fonts that align with your app’s branding or create a specific atmosphere. You can easily reference custom fonts in your styles and apply them to text elements.
- Icon Libraries: Xamarin.Forms provides support for popular icon libraries like Font Awesome and Material Icons. These libraries offer a vast collection of scalable vector icons that can be easily integrated into your app. By using icons, you can communicate actions, improve navigation, and enhance the visual appeal of your user interface.
Theming Your App with Xamarin Forms Shell
Theming is an essential aspect of creating visually consistent apps. Xamarin Forms Shell offers theming capabilities, allowing you to define color schemes, styles, and other visual attributes at a global level.
With Xamarin Forms Shell, you can implement theming capabilities to allow users to personalize the appearance of your app or to provide different visual experiences based on user preferences.
- Light and Dark Themes: Xamarin.Forms Shell supports the implementation of light and dark themes. This feature allows users to switch between different color schemes, enhancing accessibility and providing a tailored experience. You can define different styles for each theme and dynamically apply them based on user selection.
- Dynamic Theming: Xamarin.Forms Shell provides the flexibility to implement dynamic theming based on factors like time of day or user preferences. For example, you can automatically switch to a dark theme during nighttime or allow users to customize the app’s colors within predefined options.
Implementing Responsive UI Designs
In the era of multiple devices with varying screen sizes, responsive UI design is crucial. Xamarin Forms Shell supports responsive design principles, enabling you to create adaptive and user-friendly interfaces across different devices.
Xamarin Forms Shell also enables you to create responsive UI designs that adapt and scale gracefully across different screen sizes and orientations.
- Layout Options: Xamarin.Forms offers a variety of layout options, such as stack layouts, grid layouts, and flex layouts. These layout containers allow you to arrange and position elements in a responsive manner, ensuring proper alignment and spacing across different devices.
- Device-Specific Styling: Xamarin Forms Shell provides the ability to define platform-specific styles and behaviors. This allows you to tailor the appearance and functionality of your app to specific platforms, ensuring a consistent and native-like experience for users.
Advanced Shell Features
Tabbed and Flyout Navigation Patterns
Xamarin Forms Shell provides built-in support for implementing tabbed and flyout navigation patterns. You can easily create tabbed views and flyout menus to enhance the navigation experience for your app users.
- Tabbed Navigation: Tabbed navigation allows users to switch between different sections or categories of content with a single tap. With Xamarin Forms Shell, you can easily implement tabbed navigation by defining tabs and associating them with specific content pages. This pattern is ideal for organizing content that belongs to distinct categories or workflows.
- Flyout Navigation: Flyout navigation, also known as hamburger menu, provides a compact and convenient way to access different app sections. When users tap on the menu icon, a side panel or drawer slides out, revealing navigation options. Xamarin Forms Shell simplifies the implementation of flyout navigation, allowing you to define the menu structure and associate content with each menu item effortlessly.
Shell Section and Content Views
With Xamarin Forms Shell, you can organize your app’s content into sections and define custom content views within each section. This allows for better organization and separation of different parts of your app.
- Shell Sections: In Xamarin Forms Shell, a shell section represents a logical grouping of related content pages. By organizing your app’s screens into sections, you can simplify navigation and improve the overall user experience. Each section can have its own set of tabs, flyout menu items, and navigation hierarchy.
- Content Views: Content views are the individual screens or pages within a shell section. They represent the actual content that users interact with. Xamarin Forms Shell allows you to define content views using XAML or code, giving you the flexibility to design and customize each screen according to your app’s requirements.
Shell Templates and Data Templates
Xamarin Forms Shell introduces the concept of shell templates and data templates to streamline the creation and presentation of app screens, providing a consistent and efficient way to manage content and data.
Xamarin Forms Shell offers the flexibility of using pre-defined shell templates to accelerate the app development process. Additionally, you can utilize data templates to dynamically generate UI components based on the data source.
- Shell Templates: Shell templates define the overall structure and appearance of your app’s screens. With shell templates, you can establish a common layout, including headers, footers, and navigation elements, that is automatically applied to all content views within a shell section. This saves development time and ensures a consistent user interface across your app.
- Data Templates: Data templates allow you to define the visual representation of data-bound items within a content view. By defining data templates, you can specify how each item in a collection is rendered, including layout, styling, and data bindings. This enables you to display dynamic data in a structured and visually appealing manner.
Handling Back Navigation and Deep Linking
In a mobile app, it is essential to handle back navigation and deep linking effectively to ensure a seamless user experience and simplify user interactions.
Back navigation and deep linking are critical aspects of mobile app development. Xamarin Forms Shell provides built-in support for handling back navigation and deep linking scenarios, ensuring a seamless user experience.
- Back Navigation: Xamarin Forms Shell provides built-in support for handling back navigation, allowing users to navigate back to previous screens or sections effortlessly. By default, Shell maintains a navigation stack, enabling users to traverse their path backward through the app. You can customize the back navigation behavior to meet specific requirements, such as confirming user actions or preventing navigation in certain scenarios.
- Deep Linking: Deep linking enables users to access specific screens or content within an app directly, bypassing the regular navigation flow. Xamarin Forms Shell offers deep linking capabilities, allowing you to define custom URI schemes or integrate with existing deep linking frameworks. This functionality enables seamless integration with other apps and platforms, enhancing user engagement and productivity.
MVVM Pattern with Xamarin Forms Shell
Introduction to MVVM Architecture
The MVVM (Model-View-ViewModel) architecture is a widely adopted design pattern in Xamarin Forms Shell development. It promotes a separation of concerns, making it easier to manage and maintain complex application logic.
In MVVM, the Model represents the data and business logic, the View is responsible for the user interface, and the ViewModel acts as a mediator between the Model and the View. This architecture enhances code reusability, testability, and maintainability.
Implementing MVVM Pattern with Xamarin Forms Shell
Xamarin Forms Shell provides excellent support for implementing the MVVM pattern in your mobile app development. With MVVM, you can achieve a clean separation of UI and business logic, making your codebase more modular and easier to understand.
To implement MVVM with Xamarin Forms Shell, you’ll typically create a ViewModel for each View, which will encapsulate the business logic and expose properties and commands that the View can bind to. By leveraging data binding, the ViewModel communicates with the View and updates it based on changes in the underlying data.
Learn how to implement the MVVM pattern in combination with Xamarin Forms Shell. We’ll cover the separation of concerns, data binding, and how to create view models for your app’s pages.
Binding Data to Shell Components
Data binding is a powerful feature in Xamarin.Forms that enables the synchronization of data between your app’s business logic and the UI. Discover how to leverage data binding with Xamarin Forms Shell components.
Data binding is a crucial aspect of MVVM and Xamarin Forms Shell. It allows you to establish a connection between the View and the ViewModel, enabling automatic updates of the UI when the underlying data changes.
Xamarin Forms Shell supports various types of data binding, including one-way, two-way, and event-based bindings. You can bind data to Shell components such as labels, buttons, lists, and more. This allows you to create dynamic and responsive user interfaces that reflect changes in the underlying data in real time.
Command Handling and Event Aggregation
Commands and event aggregation play a vital role in handling user interactions and communication between components. We’ll delve into how Xamarin Forms Shell facilitates command handling and event aggregation within the MVVM pattern.
In addition to data binding, Xamarin Forms Shell provides mechanisms for handling user interactions and triggering actions in response to events. Commands and event aggregation play a vital role in achieving this functionality within the MVVM pattern.
Commands are objects that encapsulate an action and can be bound to UI elements such as buttons or gestures. With commands, you can delegate the execution of specific actions to the ViewModel, keeping the View free from unnecessary business logic. This promotes code reusability and maintainability.
Event aggregation, on the other hand, enables communication between different parts of your application without creating tight coupling. It allows you to publish and subscribe to events, facilitating the exchange of information between ViewModels or components. This promotes loose coupling and enhances the overall flexibility of your app’s architecture.
Working with Shell Components
MasterDetail and Flyout Pages
MasterDetail and Flyout pages are essential components in Xamarin Forms Shell that enable you to create intuitive navigation experiences in your mobile applications.
MasterDetail and Flyout pages provide efficient ways to create navigational structures in Xamarin Forms Shell. We’ll explore the implementation and customization of these components to optimize the user experience.
A MasterDetail page consists of a master page and a detail page. The master page typically contains a menu or a list of options, while the detail page displays the main content. This navigation pattern is commonly used for scenarios where you have a hierarchical structure or need to present different views based on user interactions.
On the other hand, Flyout pages provide a similar navigation concept but with a more modern and flexible approach. The flyout page acts as a sliding drawer that reveals a menu or navigation options when triggered. This pattern is commonly used in applications that prioritize a clean and minimalist user interface.
Tabbed Pages and Bottom Tab Bars
Tabbed pages and bottom tab bars are popular user interface components that allow you to organize content into multiple tabs, making it easier for users to switch between different sections or views of your application.
Tabbed pages and bottom tab bars offer intuitive navigation options for users to switch between different sections of your app. Discover how to incorporate and customize these components in Xamarin Forms Shell.
In Xamarin Forms Shell, you can effortlessly create tabbed pages and bottom tab bars, providing a seamless and intuitive navigation experience. Tabbed pages display each tab as a separate section, while bottom tab bars position the tabs at the bottom of the screen for convenient one-handed navigation.
These components are widely used in various types of applications, such as social media platforms, e-commerce apps, and productivity tools. They enhance usability and help users navigate between different sections of your app efficiently.
Shell Search Functionality
Xamarin Forms Shell simplifies the integration of search functionality within your app. Learn how to implement search features, handle search queries, and display search results using Shell components.
Search functionality is a crucial aspect of many applications, enabling users to find specific content quickly. Xamarin Forms Shell provides built-in support for integrating search functionality into your app, making it easier for users to search and discover relevant information.
With Shell search functionality, you can add a search bar to your user interface, allowing users to enter search queries and retrieve results based on predefined search criteria. This feature enhances the usability and accessibility of your app, enabling users to find the content they need with minimal effort.
Shell Toolbar and Context Menus
The Shell toolbar and context menus are powerful components that provide additional options and actions to users within your application. The toolbar is typically located at the top of the screen and contains buttons or icons for common actions, while context menus offer a set of context-specific options that appear when users perform certain interactions, such as long-pressing on an item.
Xamarin Forms Shell makes it easy to customize and extend the toolbar and context menus to fit your application’s needs. You can add buttons, icons, and other interactive elements to the toolbar, enabling users to perform actions with a single tap. Context menus provide a convenient way to present additional options and actions relevant to the selected item or context.
Performance Optimization and Best Practices
Improving App Startup and Navigation Performance
Optimizing the startup time and navigation performance is crucial for providing a smooth user experience. Discover techniques and best practices to reduce app loading times and enhance navigation efficiency.
When developing mobile applications using Xamarin Forms, it’s essential to prioritize performance optimization to ensure a smooth and responsive user experience. One critical aspect to focus on is app startup and navigation performance.
To improve app startup time, you can utilize techniques such as optimizing the initialization process, minimizing the number of dependencies, and leveraging preloading strategies. By reducing the loading time, you can provide users with a quicker app launch, enhancing their satisfaction and engagement.
Efficient navigation performance is equally important. You can achieve this by optimizing the navigation flow, minimizing unnecessary page transitions, and leveraging Xamarin Forms Shell’s built-in caching mechanisms. These strategies help reduce the loading time when navigating between different sections of your app, resulting in a seamless and fluid user experience.
Managing Memory and Resources Efficiently
Efficient memory and resource management are essential for maintaining app performance. Learn how to optimize memory usage and handle resources effectively to ensure your Xamarin Forms Shell app runs smoothly.
Memory management plays a crucial role in maintaining the performance and stability of your Xamarin Forms app. Properly managing memory usage and resources can prevent issues like memory leaks and excessive resource consumption, leading to a more efficient and reliable application.
One effective approach is to dispose of unnecessary objects and resources promptly. This involves implementing the IDisposable interface, utilizing the using statement, and following best practices for resource cleanup. By releasing resources when they are no longer needed, you can free up memory and prevent potential performance bottlenecks.
Another aspect of efficient resource management is optimizing data loading and storage. Consider using lazy loading techniques to load data only when it’s required, implementing data pagination to retrieve data in smaller chunks, and leveraging efficient data storage mechanisms such as SQLite for local data persistence. These practices help reduce memory usage and improve overall app performance.
Implementing Asynchronous and Data Caching Techniques
Asynchronous programming and data caching can significantly impact app responsiveness. We’ll explore techniques to incorporate asynchronous operations and implement data caching strategies in Xamarin Forms Shell.
Asynchronous programming is crucial for building responsive and performant Xamarin Forms applications. By utilizing asynchronous methods and techniques, you can prevent blocking the UI thread and ensure smooth user interactions, even when performing time-consuming operations.
When fetching data from remote services or performing I/O operations, consider using asynchronous APIs provided by libraries or implementing async/await patterns. This allows your app to continue processing other tasks while waiting for the completion of asynchronous operations, resulting in a more fluid user experience.
Additionally, implementing data caching techniques can further enhance performance. By caching frequently accessed data locally, you can reduce the need for repeated network requests, resulting in faster data retrieval and improved app responsiveness. Xamarin Forms provides various caching mechanisms, such as the built-in HTTP caching support and third-party libraries like Akavache.
Handling Device-specific Optimizations
Different devices and platforms may require specific optimizations to deliver the best user experience. Discover how to handle device-specific considerations and implement platform-specific optimizations with Xamarin Forms Shell.
To deliver the best possible performance, it’s important to consider device-specific optimizations. Different devices may have varying capabilities, processing power, and screen sizes, requiring specific adjustments to ensure optimal performance and user experience.
For example, you can leverage platform-specific APIs and features to take advantage of device-specific optimizations. This may involve using native libraries or APIs for computationally intensive tasks, implementing responsive UI designs to adapt to different screen sizes, and optimizing resource usage based on device specifications.
Furthermore, considering the platform guidelines and recommendations provided by Apple and Google for iOS and Android, respectively, can help you ensure compatibility and performance optimization. Adhering to these guidelines ensures that your app meets the platform standards and provides a seamless user experience across different devices.
Testing and Debugging Xamarin Forms Shell Apps
Unit Testing Your Xamarin Forms Shell App
Ensure the quality and reliability of your Xamarin Forms Shell app by implementing unit testing. Learn how to write unit tests for different components of your app and automate the testing process.
Unit testing plays a crucial role in ensuring the quality and stability of your Xamarin Forms Shell app. By writing unit tests, you can verify the behavior and functionality of individual components, classes, and methods within your application.
To effectively unit test your Xamarin Forms Shell app, you can utilize testing frameworks such as NUnit or Xamarin.UITest. These frameworks provide a set of tools and APIs that allow you to write test cases, define assertions, and execute tests against specific functionalities.
When writing unit tests, it’s important to cover different scenarios and edge cases to ensure comprehensive test coverage. You can test various aspects of your app, including navigation, data binding, input validation, and business logic.
By implementing unit tests, you can detect and fix bugs early in the development process, improve code maintainability, and ensure that changes or updates to your app do not introduce regressions.
Debugging Techniques and Tools
Debugging is an essential part of the development process, allowing you to identify and resolve issues within your Xamarin Forms Shell app. With the right debugging techniques and tools, you can effectively diagnose and fix bugs, ensuring a smooth user experience.
Xamarin provides powerful debugging capabilities through integrated development environments (IDEs) like Visual Studio and Visual Studio for Mac. These IDEs offer features such as breakpoints, step-through debugging, and variable inspection, enabling you to trace the execution flow and analyze the state of your app during runtime.
When debugging your Xamarin Forms Shell app, you can leverage debugging techniques such as logging, exception handling, and conditional breakpoints. Logging allows you to output relevant information to the console or log files, helping you understand the app’s behavior and identify potential issues. Exception handling enables you to catch and handle runtime exceptions, preventing app crashes and providing a better user experience.
Additionally, you can use remote debugging to troubleshoot issues that occur on physical devices or emulators. This allows you to connect the debugger to the running app and inspect its state, variables, and stack traces remotely.
Profiling and Performance Analysis
Profiling and performance analysis are vital for optimizing the performance of your Xamarin Forms Shell app. By identifying performance bottlenecks and areas for improvement, you can enhance the app’s responsiveness and efficiency.
Xamarin provides profiling tools that allow you to analyze various aspects of your app’s performance, such as CPU and memory usage, network requests, and rendering performance. These tools help you identify areas of your code that consume excessive resources or execute slowly, enabling you to optimize those sections for better performance.
Profiling your app also helps you detect memory leaks and excessive object allocations. By analyzing memory usage patterns and identifying objects that are not properly released, you can ensure efficient memory management and prevent crashes or performance degradation.
Furthermore, performance analysis tools like Xamarin Profiler and third-party tools like Xamarin Essentials Metrics help you gather metrics and insights about your app’s performance in real-world scenarios. These tools allow you to simulate various usage scenarios and collect data, helping you make informed decisions about optimizing your app’s performance.
Publishing and Distribution
Preparing Your Xamarin Forms Shell App For Release
Before releasing your Xamarin Forms Shell app to the public, it’s crucial to ensure that it meets the necessary requirements and is well-prepared for distribution. This involves a series of steps to optimize your app’s performance, security, and user experience.
Firstly, conduct thorough testing of your app on various devices and operating systems to identify and fix any bugs or compatibility issues. Perform regression testing to ensure that new features or updates haven’t introduced any regressions.
Next, optimize your app’s performance by minimizing resource usage, optimizing code, and implementing caching mechanisms where appropriate. This will help ensure a smooth and responsive user experience.
Pay attention to security measures, such as encrypting sensitive data, implementing secure communication protocols, and adhering to best practices for user authentication and authorization. Protecting user data and maintaining user privacy are of utmost importance in today’s digital landscape.
Additionally, consider internationalization and localization aspects of your app. Make sure your app supports multiple languages, cultures, and regional preferences to cater to a global audience.
App Store Submission and Review Process
When you’re ready to submit your Xamarin Forms Shell app to the app stores, you’ll need to follow the specific guidelines and procedures of each platform, such as the Apple App Store for iOS and Google Play Store for Android.
Review the respective app store guidelines and make sure your app complies with their policies, including content restrictions, user interface guidelines, and in-app purchase guidelines. Prepare all the necessary assets, such as app icons, screenshots, and promotional graphics, according to the required specifications.
Fill out the submission forms with accurate and detailed information about your app, including its functionality, target audience, and any special permissions it requires. Double-check that all the metadata, such as the app title, description, and keywords, effectively communicate the features and benefits of your app.
Once you’ve submitted your app, it will undergo a review process by the app store’s team. This process ensures that your app meets their quality standards and doesn’t violate any policies. The review process typically involves verifying the functionality, checking for inappropriate content, and testing for stability and performance.
Distribution Options and Deployment Strategies
Besides the official app stores, there are other distribution options and deployment strategies for your Xamarin Forms Shell app. These alternatives provide flexibility and cater to specific use cases or distribution requirements.
Consider using enterprise distribution methods, such as enterprise app stores or mobile device management (MDM) solutions, if you’re developing an internal app for a specific organization. These methods allow you to distribute apps directly to employees or authorized users without going through public app stores.
Another option is beta testing, where you can release pre-release versions of your app to a select group of users to gather feedback and identify any remaining issues before the official launch. This approach helps ensure that your app is well-received and polished when it reaches a wider audience.
Additionally, if your app targets specific platforms or devices, you may explore platform-specific distribution channels, such as Microsoft Store for Windows or Samsung Galaxy Store for Samsung devices. These channels can provide additional visibility and opportunities to reach specific user segments.
App Updates and Maintenance
Launching your Xamarin Forms Shell app is just the beginning. To keep your app relevant, competitive, and functional, it’s crucial to prioritize regular updates and ongoing maintenance.
Stay informed about platform updates and new features introduced by Xamarin, as well as the underlying operating systems. This allows you to leverage the latest capabilities and address any changes or deprecations that may affect your app.
Listen to user feedback and monitor app usage data to identify areas for improvement and feature enhancements. Prioritize bug fixes and address any reported issues promptly to ensure a positive user experience.
Plan and execute regular updates to introduce new features, improve performance, and fix any discovered vulnerabilities. Keeping your app up-to-date not only maintains user engagement but also helps protect against security risks and compatibility issues.
Consider implementing an analytics framework to gain insights into user behavior, usage patterns, and performance metrics. This data can guide your decision-making process and help you make informed decisions about future updates and enhancements.
Conclusion
Recap of the Benefits and Features of Xamarin Forms Shell
Throughout this article, we have explored the powerful capabilities of Xamarin Forms Shell and its potential to streamline mobile app development. Let’s recap the key benefits and features that make Xamarin Forms Shell a valuable framework for building cross-platform mobile applications.
- Simplified UI Development: Xamarin Forms Shell provides a high-level abstraction for creating intuitive user interfaces, allowing developers to focus on building the app’s functionality rather than spending excessive time on UI implementation.
- Navigation Made Easy: With Shell, navigating between pages and managing app navigation flows becomes effortless. The built-in navigation features, such as the tabbed and flyout patterns, allow for intuitive and organized app navigation.
- Customization and Theming: Xamarin Forms Shell offers extensive customization options, allowing developers to tailor the app’s appearance and behavior to match their desired design. This includes styling components, using custom fonts and icons, and implementing responsive UI designs.
- MVVM Pattern Integration: Xamarin Forms Shell seamlessly integrates with the Model-View-ViewModel (MVVM) architectural pattern. This promotes separation of concerns, enhances code maintainability, and facilitates efficient data binding between the UI and business logic.
- Performance Optimization: Xamarin Forms Shell provides various performance optimization techniques, such as startup and navigation performance improvements, efficient resource management, and asynchronous and data caching techniques. These optimizations help deliver a smooth and responsive user experience.
- Testing and Debugging Support: The framework offers built-in support for unit testing, debugging, and profiling. Developers can leverage these tools to identify and fix issues, ensuring the stability and reliability of their Xamarin Forms Shell apps.
Final Thoughts on Streamlining Mobile App Development with Xamarin Forms Shell
As mobile app development continues to evolve, Xamarin Forms Shell provides a powerful toolset for developers to streamline the process. By leveraging its features, implementing best practices, and staying updated with the latest advancements, you can elevate your mobile app development workflow and deliver exceptional user experiences.
In conclusion, Xamarin Forms Shell offers a comprehensive framework that simplifies navigation, enhances UI customization, and promotes efficient development practices. With its rich set of features and flexibility, Xamarin Forms Shell empowers developers to create high-quality, cross-platform mobile apps with ease.
Thank you for joining us on this journey to explore Xamarin Forms Shell and its impact on mobile app development.
Happy coding!
Reference:
https://docs.microsoft.com/en-us/xamarin/xamarin-forms/app-fundamentals/shell/


