
Boost Your Productivity: 3 Tips for Using X-Ray Plugins
November 5, 2023
In today’s fast-paced world, productivity plays a crucial role in achieving success and staying ahead. One powerful tool that can significantly enhance productivity is X-Ray plugins. These plugins offer a range of features and functionalities that can streamline workflows, automate tasks, and boost efficiency. In this article, we will explore the world of X-Ray plugins and uncover how they can transform your productivity levels.
Understanding X-Ray Plugins
X-Ray plugins are software extensions that integrate with various applications and systems to provide additional functionalities. These plugins are designed to optimize productivity by offering advanced features and tools tailored to specific needs. By leveraging X-Ray plugins, individuals and businesses can unlock new levels of efficiency, saving valuable time and resources.
Tip 1: Selecting the Right X-Ray Plugin
When choosing an X-Ray plugin, it’s important to consider several factors to ensure it aligns with your specific needs and workflow. Firstly, assess the compatibility of the plugin with your existing tools and systems. Look for plugins that seamlessly integrate and work harmoniously with your preferred applications.
Additionally, evaluate the reputation and reliability of the plugin by researching user reviews and ratings from trusted sources. This will give you insights into the plugin’s performance, stability, and user satisfaction.
Researching and Comparing X-Ray Plugins
To find the most suitable X-Ray plugin, utilize online resources that offer comprehensive listings and comparisons. These resources provide valuable information about various plugins, their features, and pricing models.
Additionally, read reviews and testimonials from users who have hands-on experience with the plugins you’re considering. By conducting thorough research and comparing multiple options, you can make an informed decision and select the best X-Ray plugin for your productivity needs.
User-Friendly Interface and Features
An intuitive interface is essential for maximizing the usability of an X-Ray plugin. Look for plugins that offer a user-friendly design, with clear navigation and easily accessible features. An organized layout and well-designed interface contribute to a seamless user experience.
Additionally, consider the specific features offered by the plugin. Look for functionalities that align with your workflow requirements and can streamline your tasks effectively. Features like task automation, data analysis, and report generation can significantly enhance your productivity.
Tip 2: Mastering the Basics of X-Ray Plugin Setup
Once you’ve selected the right X-Ray plugin, it’s time to set it up for optimal performance. Most plugins provide a step-by-step guide to help you through the setup process. Follow the instructions carefully, ensuring that you configure the plugin according to your specific needs.
Take advantage of customization options to tailor the plugin to your preferred settings. This will enable you to maximize its efficiency and align it with your unique workflow requirements.
Integrating X-Ray Plugins with Existing Tools
To unlock the full potential of X-Ray plugins, integrate them seamlessly with your existing productivity tools. Most X-Ray plugins are designed to work in conjunction with popular applications such as project management software, email clients, and document editors.
By integrating these tools, you can streamline your workflow and eliminate the need for manual data transfer. This integration allows for a more efficient and cohesive work environment, enhancing productivity across multiple platforms.
Advanced Settings and Customization
Delve deeper into the capabilities of your chosen X-Ray plugin by exploring its advanced settings and customization options. These settings often provide additional functionalities and allow you to tailor the plugin according to your specific requirements.
Customize the plugin’s behavior, preferences, and notifications to suit your working style. By leveraging the advanced settings, you can fine-tune the plugin’s performance and adapt it to your unique productivity needs.
Tip 3: Unlocking Hidden Productivity Boosters
X-Ray plugins often come packed with hidden productivity boosters that can supercharge your efficiency. Take the time to explore these lesser-known features and shortcuts to maximize the benefits of your chosen plugin. Here are some pro tips and tricks to enhance your productivity:
- Custom Workflows: Discover the ability to create custom workflows within your X-Ray plugin. These workflows allow you to automate repetitive tasks, saving you valuable time and effort. By setting up predefined sequences of actions, you can streamline your workflow and eliminate manual steps.
- Keyboard Shortcuts: Familiarize yourself with the keyboard shortcuts offered by your X-Ray plugin. These shortcuts provide quick access to frequently used features and functions. By mastering these shortcuts, you can navigate through the plugin effortlessly, increasing your speed and productivity.
- Batch Processing: Many X-Ray plugins offer batch processing capabilities, allowing you to apply actions to multiple items simultaneously. Whether it’s renaming files, applying tags, or exporting data, take advantage of batch processing to complete tasks in bulk, reducing time and effort.
- Advanced Filtering: Dive into the advanced filtering options available in your X-Ray plugin. These filters enable you to narrow down search results, focus on specific criteria, and pinpoint the exact information you need. By mastering the art of advanced filtering, you can efficiently analyze data and extract valuable insights.
- Templates and Presets: Explore the template and preset functionalities within your X-Ray plugin. These features allow you to save and reuse settings or configurations for repetitive tasks. By creating templates or presets, you can standardize processes, ensuring consistency and speeding up your workflow.
Streamlining Workflow with X-Ray Plugins
X-Ray plugins serve as powerful tools for streamlining your workflow and optimizing productivity. Here are some additional strategies for leveraging X-Ray plugins effectively:
- Task Automation: Identify tasks in your workflow that can be automated using X-Ray plugins. Whether it’s generating reports, analyzing data, or sending notifications, automate these processes to free up time for more critical activities.
- Integrating Data Sources: Integrate data sources with your X-Ray plugin to centralize information and eliminate the need for manual data entry. Connect your plugin to relevant databases, APIs, or cloud services to ensure data consistency and real-time updates.
- Collaboration Features: If your work involves collaboration with team members or clients, explore the collaboration features of your X-Ray plugin. These features can include file sharing, commenting, or version control, enabling seamless collaboration and improving team productivity.
Increasing Focus and Minimizing Distractions
X-Ray plugins can assist in maintaining focus and minimizing distractions, enabling you to accomplish tasks efficiently. Consider the following strategies:
- Distraction Blocking: Some X-Ray plugins offer distraction-blocking features that prevent access to specific websites or applications during focused work periods. Utilize these features to create a distraction-free environment and enhance your concentration.
- Task Prioritization: Leverage the task prioritization capabilities of your X-Ray plugin. Organize your tasks based on importance, deadlines, or urgency, ensuring that you allocate your time and energy to the most critical activities.
Collaboration and Team Productivity
X-Ray plugins are not only beneficial for individual productivity but can also enhance collaboration within teams. Consider the following practices:
- Shared Workspaces: Explore the shared workspace functionalities of your X-Ray plugin. These workspaces allow team members to collaborate in real-time, share documents, and track progress collectively, fostering teamwork and increasing overall productivity.
- Data Syncing: If multiple team members are using the same X-Ray plugin, ensure that data syncing is enabled. This allows for seamless sharing of productivity data, ensuring everyone is up to date and on the same page.
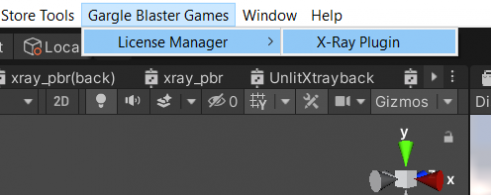
Activating License
To use the X-Ray plugins you need to activate it on your PC using the license.
- Open The License Manager on the top menu.
- GargleBlaster Games > License Manager > X-Ray Plugin.
- Enter the license key given in your account (or Invoice).
- You can log in to your account here.
Applying X-Ray to Models
This process has 2 parts, X-Ray Material and X-Ray Positions.
X-Ray Material
- To make an object X-ray, create a new material and apply XrayPBR or XrayUnlit.
- Then apply this material to Skinned Mesh Renderer / Mesh Renderer.
- Then apply the script call “Xraypoint” to the object.
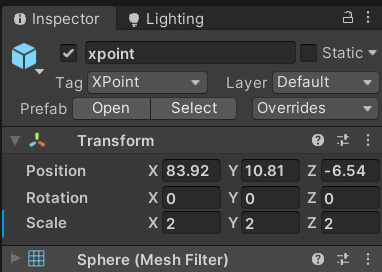
X-Ray Position
To define a position as an X-ray position simply add a tag called “Xpoint” to any game object.
That object’s position will be the world position will be x-ray position (maximum of 4 for the pro 1 for the free).
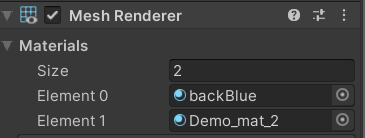
Creating a Dual Side X-Ray
- Make the number of materials in MeshRenderer /Skinned MeshRenderer to 2.
- Add a material to material[0] first slot with (XrayUnlitBack / XrayPBRBack )Shader,
- And add a 2nd martial with (XrayUnlit / XrayPBR ) to second slot (material[1]).
We have created this custom shader that enables x-ray style functionality for your Unity3D project.
X-Ray plugins are compatible with Lightweight and Universal Rendering Pipelines.
Demo version available on Unity3D store
Check Out Demo vs Pro Version on YouTube
Troubleshooting and Support
While X-Ray plugins are designed to enhance productivity, occasional issues may arise. Here’s how to troubleshoot common problems and access support:
- Knowledge Base and FAQs: Most X-Ray plugin developers provide comprehensive knowledge bases and FAQs on their websites. These resources offer solutions to common issues, step-by-step guides, and troubleshooting tips. Before seeking direct support, explore these resources to find answers to your questions.
- Support Channels: If you encounter a problem that cannot be resolved through the available resources, reach out to the X-Ray plugin’s support team. Contact them through their designated channels, such as email, live chat, or support tickets. Provide detailed information about the issue, including screenshots or error messages, to help expedite the resolution process.
Compatibility and Updates
To ensure a seamless experience with X-Ray plugins, consider the following compatibility and update considerations:
- Platform Compatibility: Verify that your chosen X-Ray plugin is compatible with your operating system and platform. Some plugins may be designed specifically for Windows, macOS, or certain web browsers. Checking compatibility beforehand will prevent any compatibility issues or functionality limitations.
- Plugin Updates: Stay up to date with the latest plugin updates and new features. Plugin developers often release updates to improve performance, fix bugs, and introduce new functionalities. Regularly check for updates within your plugin and install them promptly to benefit from the latest enhancements and security patches.
Security and Privacy Considerations
When using X-Ray plugins, it’s important to prioritize security and protect sensitive data. Consider the following security and privacy considerations:
- Data Encryption: Verify that your X-Ray plugin employs robust data encryption measures. Encryption ensures that your data remains secure during storage and transmission, safeguarding it from unauthorized access.
- Permission Management: Review the permissions required by the X-Ray plugin during installation. Grant only the necessary permissions and avoid plugins that request excessive access to your system or personal information.
Exploring Alternative X-Ray Plugins
While discussing the specific X-Ray plugin in this article, it’s worth mentioning that there are alternative plugins available in the market. These alternative plugins offer unique features, functionalities, and interfaces. If the featured X-Ray plugin doesn’t fully meet your requirements, consider exploring these alternatives to find a better fit for your specific productivity needs.
User Tips and Recommendations
To gain further insights and learn from experienced users, consider the following user tips and recommendations:
- User Forums and Communities: Engage with user forums and communities dedicated to X-Ray plugins. These platforms provide a wealth of knowledge, tips, and best practices shared by experienced users. Participate in discussions, ask questions, and share your own insights. The collective wisdom of these communities can help you uncover hidden gems and discover innovative ways to maximize the productivity potential of your X-Ray plugin.
- Online Tutorials and Video Guides: Explore online tutorials and video guides created by power users or experts in the field. These resources offer step-by-step instructions, demonstrations, and insider tips on using X-Ray plugins effectively. By following along with these tutorials, you can quickly grasp advanced techniques and unlock additional productivity-boosting features.
- Stay Updated with Plugin News and Blogs: Keep yourself updated with the latest news, updates, and developments related to your chosen X-Ray plugin. Subscribe to plugin-related blogs, newsletters, or social media channels to receive timely information about new features, enhancements, and productivity hacks. Staying informed will ensure that you make the most of your X-Ray plugin’s capabilities.
Evaluating Return on Investment (ROI)
To gauge the effectiveness and value of your X-Ray plugin, consider evaluating the return on investment. Here’s how:
- Productivity Improvements: Assess the impact of the X-Ray plugin on your productivity. Measure factors such as time saved, increased efficiency, and reduced manual effort. Compare your productivity before and after implementing the plugin to quantify the improvements.
- Cost Savings: Evaluate the cost savings resulting from using the X-Ray plugin. Consider factors like reduced labor costs, eliminated expenses for additional tools or software, and increased output or revenue generation. Calculate the financial benefits obtained through increased productivity and efficiency.
Conclusion: Harnessing the Power of X-Ray Plugins
In today’s fast-paced world, productivity is paramount, and X-Ray plugins can be game-changers. By incorporating these plugins into your workflow, you can unlock new levels of efficiency, streamline tasks, and save valuable time. Remember the tips discussed in this article: choose the right plugin, master its setup, explore hidden features, streamline your workflow, and leverage collaboration and team productivity. By harnessing the power of X-Ray plugins, you can boost your productivity, achieve your goals, and stay ahead in today’s competitive landscape. Take action today and start reaping the benefits of X-Ray plugins in your daily workflow.


